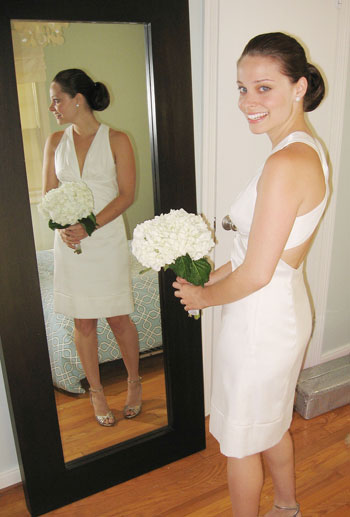
We are going to be DIYing the flower bouquets for me and the girls the day before the wedding, so I figured it would be a good idea to do a dry run in order to figure out how hard it is to make a bouquet and how long it would take an amateur like me to do it. Turns out, it was super easy and only took about twenty minutes. Of course, it helped that I kept it real simple.
Back in October, I collected inspiring photos of floral bouquets and centerpieces that were beautiful, bright, and happy. But I'm not a pro, and flowers are expensive, and many flowers I was falling in love with would not be in season anyway. So I went back to my engineering roots and decided to follow the KISS principle (as in, Keep It Simple, Stupid). Sherry's bouquet from their YoungHouseLove wedding pointed me in the right direction.
Hydrangeas are perfect for keeping it simple. They are in season in June, each stem is very voluminous and has high visual impact, and you only need a few stems to make a substantial looking bouquet. Also, my dress is not the traditional white, but somehow, adding white flowers to the outfit felt bridal to me.
For supplies, I bought:
I followed the tutorial posted on APW, which turned out to be super easy and self-explanatory. It was even easier for me because I didn't have to worry about putting together different kinds of flowers. First, I took three hydrangeas and wrapped floral tape around them. The bouquet actually looked pretty good with only three hydrangeas (that's how many Sherry used), but I figured I might as well use all six as long as I had them. In hind sight, I would probably leave it at three - six hydrangeas turned out a bit lopsided, probably because I'm such an expert at putting flowers together. After I had my three center stems wrapped with tape, I added one hydrangea at a time, wrapping it with tape to the center stems. After all six stems were covered in floral tape, I trimmed the stems and wrapped the white satin ribbon around the bouquet to hide the floral tape. To keep the ribbon in place, I used one pearl head pin at the top and one at the bottom of the stems.
I like how it turned out, besides the lopsidedness. D said it looks like broccoli. Good thing he doesn't have to walk down the aisle with it.
Back in October, I collected inspiring photos of floral bouquets and centerpieces that were beautiful, bright, and happy. But I'm not a pro, and flowers are expensive, and many flowers I was falling in love with would not be in season anyway. So I went back to my engineering roots and decided to follow the KISS principle (as in, Keep It Simple, Stupid). Sherry's bouquet from their YoungHouseLove wedding pointed me in the right direction.
 |
| Sherry's hydrangea wedding bouquet. From here. |
Hydrangeas are perfect for keeping it simple. They are in season in June, each stem is very voluminous and has high visual impact, and you only need a few stems to make a substantial looking bouquet. Also, my dress is not the traditional white, but somehow, adding white flowers to the outfit felt bridal to me.
For supplies, I bought:
- Six stems of hydrangeas ($16)
- Green floral tape ($4)
- White satin ribbon, 2 rolls ($8)
- Corsage pins ($4)
I followed the tutorial posted on APW, which turned out to be super easy and self-explanatory. It was even easier for me because I didn't have to worry about putting together different kinds of flowers. First, I took three hydrangeas and wrapped floral tape around them. The bouquet actually looked pretty good with only three hydrangeas (that's how many Sherry used), but I figured I might as well use all six as long as I had them. In hind sight, I would probably leave it at three - six hydrangeas turned out a bit lopsided, probably because I'm such an expert at putting flowers together. After I had my three center stems wrapped with tape, I added one hydrangea at a time, wrapping it with tape to the center stems. After all six stems were covered in floral tape, I trimmed the stems and wrapped the white satin ribbon around the bouquet to hide the floral tape. To keep the ribbon in place, I used one pearl head pin at the top and one at the bottom of the stems.
 |
| Simple, six-stem hydrangea wedding bouquet. |
I like how it turned out, besides the lopsidedness. D said it looks like broccoli. Good thing he doesn't have to walk down the aisle with it.
 |
| Another view of the hydrangea bouquet. Note the lopsidedness. |
It is pretty :)
ReplyDeleteThanks! Can't go wrong with flowers, right? :)
DeleteWow! Beautiful wedding bouquet. I like it! It's really classic and elegant. Thanks for sharing this to us.
ReplyDeleteThank you! Glad you like it.
Delete