Early on in the wedding planning process, I decided to DIY our Save-the-Dates. Generally, I think that STDs (as I lovingly call them) are not necessary. But we do have some out-of-town guests that have trouble remembering dates that far in advance, and I also thought it would be a nice opportunity for me to get a bit creative without putting too much pressure on myself, so I decided to make the STDs for the guests.
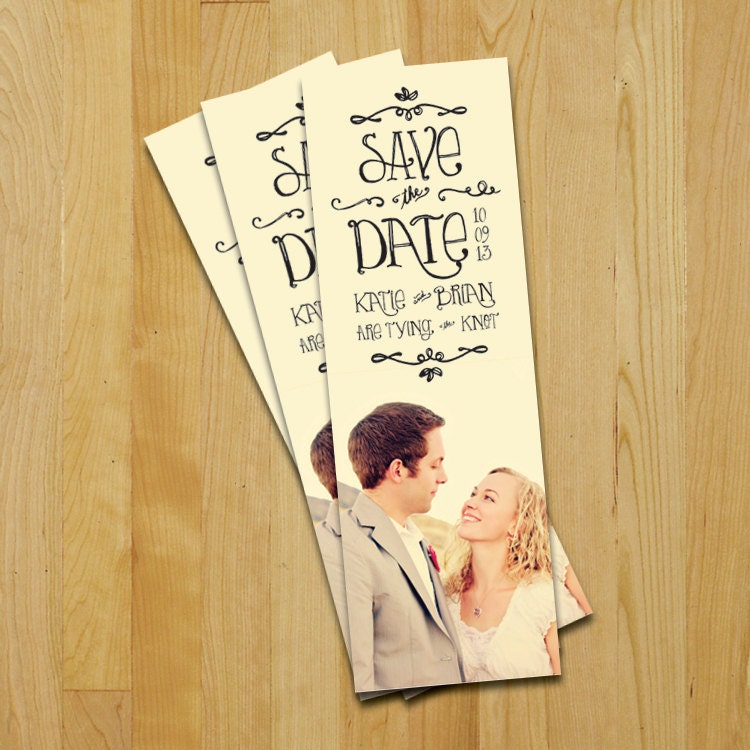
While browsing on Pinterest for inspiration, I came across an idea that I really liked - a personalized bookmark as a Save-the-Date. D and I are book lovers, and lots of our friends and family are, too, so I thought that a bookmark would not only serve as a reminder of our wedding date, but it would also be potentially useful to our guests long after the wedding is over. And, it is subtly representative of our mutual bookworminess. Here is the design that served as my inspiration:
Before diving into this DIY project, I wanted to make sure that I was prepared and knew what I was getting myself into. First, I thought about how I would actually make these STDs by myself. I figured that if I kept the dimensions of each bookmark at 2" by 6", then I could fit at least four on a regular sized, 8.5" by 11" page, with plenty of room for margins and space between the bookmarks. I needed about 30 STDs, so eight pages would suffice (assuming nothing would go wrong, har har).
I then researched the paper selection available at a store like Paper Source. Of course, this research was all done online at this point. I found out that there are different weight papers, with different types of surfaces (smooth, textured, glossy, shimmery, etc.), and that there are some papers that are suitable for use with regular ink jet printers, while others are more likely togive you heart attacks jam. I decided right away that I would definitely avoid the problematic papers, and it worked out well at the end. I also did some preliminary research on envelopes, but not too much. All this time, I was paying attention to prices. This helped me confirm that, barring a terrible disaster, the DIY route would save me money. (This is definitely not always the case. For example, see my bentwood chair makeover project.) You know, because while the bookmark save-the-date found on Pinterest served as the inspiration for the design, our wedding budget served as the inspiration for the DIY route.
Armed with this information, I was ready to begin. To design the STD, I used Photoshop. The first hurdle in the design process was choosing a photo of us to use in the STD. We had planned to have our engagement photoshoot done by this time, but it had not happened yet. I was too lazy to try to take a self-timed photo of us, and so I decided to go hunting in my photo archives to see what I could find. I narrowed my selection down to three photos. The design of the STD actually dictated which one of the three I ended up using. I wanted to have a smooth transition between the photo and the white space on which I would write all the relevant information about the wedding, and this was easiest to do using a photo that had a pale sky at the top of it. Only one of my photos qualified, so that's what I went with.
With the photo selected, I moved on to the wording. The text had to cover the basics only: it had to state that this was a Save-the-Date (not to be confused with an invitation), it had to mention that D and I were getting married, the date of the wedding (duh), the general location of the wedding (city and state), and that an invitation will follow (I suspect this is crucial if you want to avoid questions from your guests about all the details that are missing from the STD). Once I laid out the text, I had to choose a font. Photoshop comes with many fonts, and I turned to those first. I selected two fonts and used those for the text. Luckily, D vetoed the fonts that I chose as too "old-fashioned". Just to clarify, there was nothing wrong with the fonts, but they were not meshing with our concept of a modern, non-traditional wedding. Once D pointed that out to me, I saw his point and went searching for a more modern font. I found what I was looking for on a website called dafont. (The font I linked to is the actual font we used on our STD design.) With the photo and font selected, and the layout finalized, the STD design was complete. Here is what we ended up with (for privacy reasons, some portions of the STD are hidden):

The next step was the purchase all the printing and mailing supplies. The shopping list included paper, envelopes, mailing labels, and postage stamps. The purpose of the mailing labels was to save my sanity - there was no way in hell I was going to write out thirty mailing addresses, AND our return address thirty times. Instead, I bought sheets of mailing labels (I chose the 30 labels per sheet variety) from Staples and created a file with all the mailing addresses laid out in a way that corresponded to the labels on the label sheet. This was easy to print, peel and apply to the envelopes. Done and done.
For paper and envelopes, I went to an actual Paper Source store. I must have spent at least an hour ogling pretty paper and notebooks and planners and calendars... you get the idea. Before I had entered that store, I had no idea that paper could be so interesting, but it was. Focusing on the paper, I narrowed down my choices to about eight shades of cream, and selected one with the texture and weight I liked the most. The employees at the store were extremely helpful in advising what kind of paper would work with my ink jet printer, and what printing settings to use. I also discovered that there were many, many different size envelopes that came in all colors of the rainbow, and everything in between. I chose the envelopes that were just big enough to fit our STDs, and I selected two colors because I couldn't choose just one.
Armed with all the supplies, it was time for the next step: printing. Honestly, I prepared myself for the worst. I was 100% positive that the printer was going to crap out on me. I was ready for the paper to jam, for the ink to run out, for the printer to suddenly stop working, and I warned D that it was very likely that I would go into a screaming fit of rage while attempting to print our STDs. The household had been given a fair warning. I had bought a pack of ten sheets, leaving me a couple of extra sheets if things went wrong.
But I was in for a surprise. The printing went surprisingly well. I did a lot of preliminary printing on regular paper to figure out the best setting (I went with "Best" quality and the highest dpi setting that my printer could support). I was also anal enough to save my picture in three different file formats to see which one printed best (in my case, out of JPEG, PNG, and TIFF, the best printed quality turned out to be JPEG, to my surprise). With the file format and the printer settings optimized, it was time for the real deal. I nervously fed the first sheet of thick Paper Source paper into the printer and hoped for the best. I literally paced around the apartment, praying to the imaginary printer gods, while the STDs were being printed. (I should note that I simply put four copies of the STD design into a Word file and printed that out eight times.) Miraculously, and completely unexpectedly, the first page printed with no issues. If I am being honest, I would say the print quality looked decent, but in no way did it look professional. I was ok with that, as this was a DIY project after all, and so I did not let that bother me.
The rest of the eight pages printed uneventfully (I didn't even run out of ink!), and I was ready to move on to the next step: cutting the STD bookmarks out of the sheets. Luckily, I had access to a paper cutter at work, and that is what I used. This is when I learned another lesson. It might be nearly impossible to perfectly align the paper when feeding it into the printer. As a result, the edges of the bookmarks were not perfectly aligned in parallel with the edges of the paper that I was cutting. That meant that if I aligned one end of a bookmark edge with the paper cutter, the other end might have some extra "white space" where it shouldn't be. So if I were to do this all over, I would choose a photo that not only had a light sky on the top, but also had a light background on the sides. That way, if the bookmarks were not perfectly cut, no one would notice it. In my case, some bookmarks ended with with a noticeable white edge around the photo part of the design. Again, I chose to let this go and not agonize over the situation. Lesson learned for when I DIY the invitations (oh yes, that will be happening).
And just like that, I was done! The STD bookmarks had been designed, printed, and cut. They were ready to be mailed in the pretty, colorful envelopes for our guests to enjoy. And most importantly, my sanity was still intact.

While browsing on Pinterest for inspiration, I came across an idea that I really liked - a personalized bookmark as a Save-the-Date. D and I are book lovers, and lots of our friends and family are, too, so I thought that a bookmark would not only serve as a reminder of our wedding date, but it would also be potentially useful to our guests long after the wedding is over. And, it is subtly representative of our mutual bookworminess. Here is the design that served as my inspiration:
Before diving into this DIY project, I wanted to make sure that I was prepared and knew what I was getting myself into. First, I thought about how I would actually make these STDs by myself. I figured that if I kept the dimensions of each bookmark at 2" by 6", then I could fit at least four on a regular sized, 8.5" by 11" page, with plenty of room for margins and space between the bookmarks. I needed about 30 STDs, so eight pages would suffice (assuming nothing would go wrong, har har).
I then researched the paper selection available at a store like Paper Source. Of course, this research was all done online at this point. I found out that there are different weight papers, with different types of surfaces (smooth, textured, glossy, shimmery, etc.), and that there are some papers that are suitable for use with regular ink jet printers, while others are more likely to
Armed with this information, I was ready to begin. To design the STD, I used Photoshop. The first hurdle in the design process was choosing a photo of us to use in the STD. We had planned to have our engagement photoshoot done by this time, but it had not happened yet. I was too lazy to try to take a self-timed photo of us, and so I decided to go hunting in my photo archives to see what I could find. I narrowed my selection down to three photos. The design of the STD actually dictated which one of the three I ended up using. I wanted to have a smooth transition between the photo and the white space on which I would write all the relevant information about the wedding, and this was easiest to do using a photo that had a pale sky at the top of it. Only one of my photos qualified, so that's what I went with.
With the photo selected, I moved on to the wording. The text had to cover the basics only: it had to state that this was a Save-the-Date (not to be confused with an invitation), it had to mention that D and I were getting married, the date of the wedding (duh), the general location of the wedding (city and state), and that an invitation will follow (I suspect this is crucial if you want to avoid questions from your guests about all the details that are missing from the STD). Once I laid out the text, I had to choose a font. Photoshop comes with many fonts, and I turned to those first. I selected two fonts and used those for the text. Luckily, D vetoed the fonts that I chose as too "old-fashioned". Just to clarify, there was nothing wrong with the fonts, but they were not meshing with our concept of a modern, non-traditional wedding. Once D pointed that out to me, I saw his point and went searching for a more modern font. I found what I was looking for on a website called dafont. (The font I linked to is the actual font we used on our STD design.) With the photo and font selected, and the layout finalized, the STD design was complete. Here is what we ended up with (for privacy reasons, some portions of the STD are hidden):

The next step was the purchase all the printing and mailing supplies. The shopping list included paper, envelopes, mailing labels, and postage stamps. The purpose of the mailing labels was to save my sanity - there was no way in hell I was going to write out thirty mailing addresses, AND our return address thirty times. Instead, I bought sheets of mailing labels (I chose the 30 labels per sheet variety) from Staples and created a file with all the mailing addresses laid out in a way that corresponded to the labels on the label sheet. This was easy to print, peel and apply to the envelopes. Done and done.
For paper and envelopes, I went to an actual Paper Source store. I must have spent at least an hour ogling pretty paper and notebooks and planners and calendars... you get the idea. Before I had entered that store, I had no idea that paper could be so interesting, but it was. Focusing on the paper, I narrowed down my choices to about eight shades of cream, and selected one with the texture and weight I liked the most. The employees at the store were extremely helpful in advising what kind of paper would work with my ink jet printer, and what printing settings to use. I also discovered that there were many, many different size envelopes that came in all colors of the rainbow, and everything in between. I chose the envelopes that were just big enough to fit our STDs, and I selected two colors because I couldn't choose just one.
Armed with all the supplies, it was time for the next step: printing. Honestly, I prepared myself for the worst. I was 100% positive that the printer was going to crap out on me. I was ready for the paper to jam, for the ink to run out, for the printer to suddenly stop working, and I warned D that it was very likely that I would go into a screaming fit of rage while attempting to print our STDs. The household had been given a fair warning. I had bought a pack of ten sheets, leaving me a couple of extra sheets if things went wrong.
But I was in for a surprise. The printing went surprisingly well. I did a lot of preliminary printing on regular paper to figure out the best setting (I went with "Best" quality and the highest dpi setting that my printer could support). I was also anal enough to save my picture in three different file formats to see which one printed best (in my case, out of JPEG, PNG, and TIFF, the best printed quality turned out to be JPEG, to my surprise). With the file format and the printer settings optimized, it was time for the real deal. I nervously fed the first sheet of thick Paper Source paper into the printer and hoped for the best. I literally paced around the apartment, praying to the imaginary printer gods, while the STDs were being printed. (I should note that I simply put four copies of the STD design into a Word file and printed that out eight times.) Miraculously, and completely unexpectedly, the first page printed with no issues. If I am being honest, I would say the print quality looked decent, but in no way did it look professional. I was ok with that, as this was a DIY project after all, and so I did not let that bother me.
The rest of the eight pages printed uneventfully (I didn't even run out of ink!), and I was ready to move on to the next step: cutting the STD bookmarks out of the sheets. Luckily, I had access to a paper cutter at work, and that is what I used. This is when I learned another lesson. It might be nearly impossible to perfectly align the paper when feeding it into the printer. As a result, the edges of the bookmarks were not perfectly aligned in parallel with the edges of the paper that I was cutting. That meant that if I aligned one end of a bookmark edge with the paper cutter, the other end might have some extra "white space" where it shouldn't be. So if I were to do this all over, I would choose a photo that not only had a light sky on the top, but also had a light background on the sides. That way, if the bookmarks were not perfectly cut, no one would notice it. In my case, some bookmarks ended with with a noticeable white edge around the photo part of the design. Again, I chose to let this go and not agonize over the situation. Lesson learned for when I DIY the invitations (oh yes, that will be happening).
And just like that, I was done! The STD bookmarks had been designed, printed, and cut. They were ready to be mailed in the pretty, colorful envelopes for our guests to enjoy. And most importantly, my sanity was still intact.

Oh I love them ! They look modern and neat and fun.
ReplyDeleteWe didn't do save the dates... just mailed the invitations directly. Since we had quite a few international guests we made the invitations as early as possible (March or early April, for our September wedding) so that people would be able to get the best deals on travel arrangements. In retrospective, save the dates are a good idea for specifically these kind of case, because by August (when we had to have the number in gross more or less confirmed for our caterer) lots of people had forgotten there was a little RSVP note and we had to chase them out by email. (No big deal though, people then were like oops and answered).
I DIY-ed our Thank you notes in a kind of similar way.... papershops are heaven huh? I love colors and textures and could spend hours there. During our portrait wedding shoot we held blackboards that said thank you and we just printed that picture several times, and then pasted it onto some colorful cardboard cards that I got at said papershop, and then put them in matching colored envelopes. Simple. We did spend hours and hours writing the addresses on all the envelopes for the invitations and thank you notes, did not really think of using mailing labels like you guys did, but I kind of liked the idea to personally write it ourselves...
Thanks! I am always impressed when people hand write the addresses and even the text in the save-the-dates and invitations, but I just don't have the patience for it! You are right, it does add a personal touch, but I also thought that since we made the STDs from scratch, that was also personal. :)
ReplyDeleteDefinitely, with your photo, and the fact that they were designed, printed and completely DIYed by you (with a little help of your printer) made your STD's personal.
ReplyDelete